TL;DR — Iced latte at home: An iced latte at home in under 5 minutes. 5 proven steps and the ice-to-milk ratio that keeps the drink crisp instead of watery.
Table of Contents
You can have a smooth, refreshing iced latte in seconds with just two ingredients and the right technique. Using freshly brewed espresso ensures rich flavor, while pouring over ice locks in chill without dilution. This method guarantees a café-quality drink faster than your morning commute.
TL;DR: Making an iced latte at home takes less than 5 minutes when you nail three things: a strong espresso base, a 1:3 milk ratio, and the right ice fill. This guide gives the 7-step iced latte at home method that beats the average café pour. No pro machine needed — a moka pot, Aeropress, or strong instant works fine. Pull the espresso, build the ice, finish with cold milk. The result: a clean, cold, layered iced latte at home ready before the coffee shop queue even moves.

Key Takeaways for an iced latte at home
- The perfect iced latte at home starts with strong espresso — moka pot, Aeropress, or even concentrated instant all work.
- Milk-to-coffee ratio for an iced latte at home is roughly 1:3 — too much milk drowns the espresso layer.
- Fill the glass with ice BEFORE pouring milk or espresso, or your iced latte at home turns watery in minutes.
- Cold milk straight from the fridge keeps the layers separated — heat ruins an iced latte at home.
- Total time for an iced latte at home: under 5 minutes from grinder to glass.
Essential Equipment and Ingredients for Speed
Having the right tools and ingredients on hand ensures your iced latte comes together in moments. A chilled glass, a reliable espresso maker or instant coffee concentrate, and a milk frother or jar for shaking are your speed allies. Pre-chilled components prevent watery results and maintain bold flavor from first sip to last.
Choosing the right espresso or coffee concentrate base
Start with a strong coffee base-espresso, cold brew concentrate, or instant espresso powder work best. Espresso delivers authentic depth, while cold brew concentrate offers smoothness with low acidity. Instant options save time without sacrificing intensity if brewed strong.
Selecting the best milk and sweetener options
Opt for milk that froths or mixes easily-whole dairy, oat, or barista-blend almond milk perform well. These create a creamy texture that balances the bold coffee.
For sweetness, liquid sweeteners like simple syrup or maple syrup blend instantly over ice, unlike granulated sugar that sinks and settles.
Choosing milk with natural sweetness or added creaminess enhances mouthfeel without overpowering your drink. Oat milk brings a subtle richness that mimics dairy, while sweetened condensed milk can double as both milk and sweetener for a decadent twist. Always chill your milk first-cold milk blends faster and keeps your latte frosty.
Factors Influencing a Perfect 5-Minute Brew
- Use freshly ground beans for maximum flavor retention
- Maintain consistent water temperature during brewing
- Choose the right grind size for quick extraction
- Balance ice-to-liquid ratios to avoid dilution
- Pre-chill your glass to preserve crema and aroma
Temperature control for immediate cooling
Hot espresso hitting room-temperature ice cools rapidly, preserving aromatic oils and preventing steam loss. Pre-chilling your serving glass maintains this effect longer. If ice melts too fast, flavor dilutes before you take the first sip.
Immediate cooling locks in richness, especially when using dark roasts. Use dense, restaurant-grade ice cubes for slower melt rates.
| Factor | Impact on Brew |
|---|---|
| Hot espresso on cold ice | Quick cooling preserves flavor complexity |
| Room-temperature glass | Increases melt speed, risking over-dilution |
Bean grind consistency and extraction speed
Fine, uniform grounds extract faster and more evenly under pressure, crucial for quick brewing. Inconsistent particles lead to under-extracted sourness or bitter over-extraction. Your grinder’s quality directly affects taste clarity.
A consistent grind ensures water flows evenly through the coffee puck, maximizing flavor in minimal time.
Blade grinders create uneven particles, which sabotage extraction balance. For best results, use a burr grinder set to espresso fineness-this delivers the concentrated shot needed before ice dilution.
Ice-to-liquid ratios to prevent over-dilution
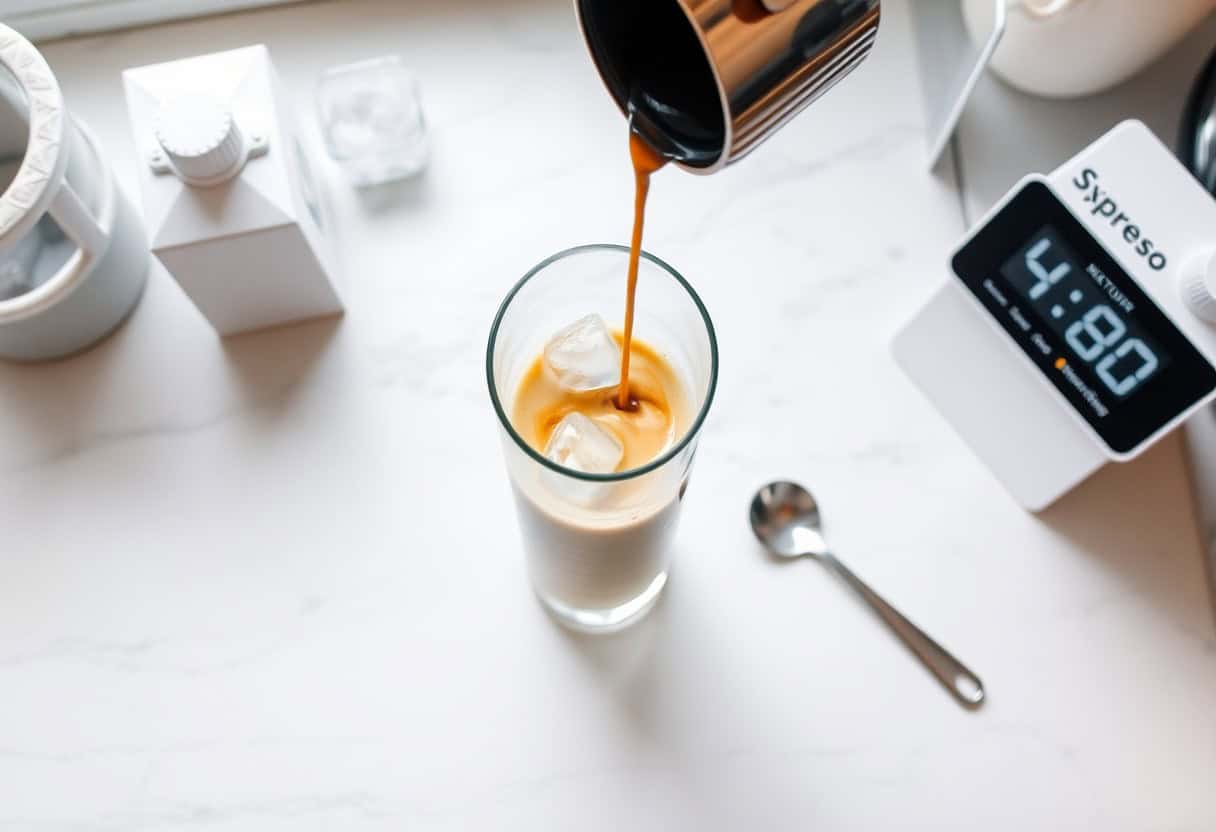
Use a 1:1 ratio of brewed espresso to ice for balanced strength. Too much ice floods the drink with water as it melts, washing out chocolate and caramel notes. Fill your cup with ice first, then pour directly over it.
This method chills instantly while limiting melt time during serving.
Fill your glass with ice before brewing to ensure the hot espresso cools on contact. Overfilling with ice leads to rapid dilution, especially if you wait to drink. For stronger results, reduce ice slightly and pre-chill the glass instead.
How-to: Step-by-Step Rapid Preparation
| Brew Time | Under 2 minutes |
| Total Time | Under 5 minutes |
| Coffee Type | Double shot espresso or strong cold brew |
| Milk Option | 5-Minute Creamy Iced Coffee with Almond Milk – Two Spoons |
Brewing the concentrated coffee shot efficiently
Use a double shot of espresso or a strong 4-ounce pour of cold brew for maximum flavor. A high-pressure machine pulls the shot in under 30 seconds, locking in rich crema that enhances body. If you don’t own an espresso maker, a Moka pot or strong French press can mimic intensity with minimal effort.
Pre-brew and chill coffee concentrate ahead of time to skip waiting. This method ensures your latte stays cold without dilution. The fastest route to bold flavor is using room-temperature concentrate poured directly over ice.
Preparing the glass and ice for maximum chill
Chill your serving glass in the freezer for 2-3 minutes before assembling. A cold vessel prevents immediate melting and maintains optimal drinking temperature. Fill it to the brim with fresh, dense ice cubes-these last longer and reduce wateriness.
Using filtered water for ice improves taste and clarity. Warmed glasses shock the drink, dulling flavor fast. Pre-chilling is a small step with a noticeable impact on texture and enjoyment.
Condensation on an unchilled glass accelerates ice melt, weakening your latte within seconds. Taking a moment to cool the container preserves the integrity of every sip, especially when using milk alternatives like almond milk that highlight subtle shifts in balance.
Combining ingredients and achieving the perfect texture
Pour the chilled milk over ice first, then slowly add the coffee. This layering technique promotes even mixing without agitation. For a creamier result, shake the milk and coffee in a sealed jar for 15 seconds before pouring.
Stir gently with a long spoon to blend without collapsing the body. The goal is a smooth, silky texture-never watery or separated. When done right, each sip feels balanced and indulgent, like a café-made version.
Shaking introduces tiny air bubbles that elevate mouthfeel, especially with almond or oat milk. This simple motion mimics professional barista methods and transforms a basic drink into something far more satisfying, all within your 5-minute window.

Pro Tips for Enhancing Flavor Without Adding Time
- Use coffee ice cubes to prevent dilution and maintain bold flavor
- Add syrups before pouring milk for even distribution
- Top with cold foam for a creamy, barista-style finish
- Pre-chill your glass to keep your latte cold longer
Utilizing coffee ice cubes to maintain strength
Regular ice melts quickly, watering down your drink and weakening the coffee flavor. Replacing it with frozen coffee cubes ensures every sip stays rich and balanced. These cubes dissolve without altering the taste, preserving the espresso’s intensity from first sip to last.
You can make them ahead in an ice tray using leftover brew. The convenience and consistency they offer makes them a smart upgrade. The
Incorporating syrups and cold foams effectively
Sweeteners and flavorings blend best when added directly to the espresso before milk. This method disperses syrups evenly without needing extra stirring. A quick pour ensures your vanilla or caramel note hits every sip.
Cold foam adds a luxurious texture in seconds-just blend cold milk with a touch of sweetener until frothy. Layer it on top for a creamy contrast that feels indulgent but takes no extra prep time. The
Adding cold foam isn’t just about taste-it elevates the sensory experience with a smooth, airy finish that hot milk can’t replicate. Since it’s served cold, it doesn’t melt into the drink, maintaining its distinct layer and enhancing mouthfeel with minimal effort.
Pre-chilling glassware for a lasting cold experience
A warm glass sabotages your iced latte’s temperature within seconds. Placing your serving glass in the freezer for 5-10 minutes before use locks in chill. This small step keeps your drink colder longer without sacrificing space for ice.
The temperature stability it provides means slower melting and more consistent sipping. The
Chilled glassware acts as a thermal buffer, especially important when using less ice to avoid over-dilution.
By starting cold, your latte maintains its refreshing quality from the first pour to the final sip, enhancing both flavor and enjoyment without adding a single extra step. The
Customizing Your Latte: Dietary and Flavor Variations
Swapping for plant-based milk alternatives
Many plant-based milks work beautifully in iced lattes, each adding its own texture and flavor. Almond, oat, soy, and coconut milks are popular choices that froth well and blend smoothly with espresso. You can even use barista blends for a creamier result without dairy.
Adjusting sweetness levels for personal preference
Sugar content should match your taste and dietary goals. Start with a teaspoon of simple syrup or maple syrup, then adjust up or down. Using sugar-free syrups or a dash of vanilla extract lets you sweeten without spiking calories.
Some prefer their latte bold and unsweetened, while others enjoy a dessert-like touch. Taste after mixing and add more sweetener in small increments. This control is one of the biggest advantages of making your latte at home-you decide exactly how sweet it should be.
Troubleshooting Common Preparation Mistakes
Fixing a bitter or sour coffee base
If your iced latte tastes bitter, you likely over-extracted the espresso. This happens when water passes through finely ground coffee for too long. Try using a coarser grind or pulling a shorter shot. A sour taste usually means under-extraction-your coffee grounds were too coarse or the brew time too short. Adjust your grind size finer and ensure your machine reaches optimal pressure.
Managing watery consistency from rapid melting
Regular ice cubes melt quickly and dilute your drink, leading to a weak flavor. Use coffee ice cubes instead-they keep your latte cold without watering it down. Simply freeze leftover brewed coffee in an ice tray ahead of time. This small change preserves the bold taste you want in every sip.
Choosing the right ice makes a noticeable difference in both temperature and strength. When you pour espresso over standard ice, rapid melting begins instantly, thinning the drink before you even stir. Coffee ice cubes maintain structural integrity longer and blend smoothly as they melt, ensuring consistent flavor from first sip to last.
To wrap up
From above, you now know how to make an iced latte at home in under 5 minutes using just espresso, milk, and ice. You pull a shot or use strong coffee, fill a glass with ice, pour in cold milk, and add your brew on top.
The result is a smooth, café-quality drink without leaving your kitchen. You control the strength, sweetness, and temperature exactly to your taste.
This method saves time and money while delivering consistent results every time. With minimal tools and ingredients, you build a routine that fits your daily life. You don’t need special equipment-just what’s already in your pantry and fridge.
Making your own iced latte is simple, fast, and satisfying when done right.
Make Your iced latte at home Today
You now have the recipe — pour your first iced latte at home in 5 minutes. Bonus brew reads:
- Café drinks without the machine: how to make mochas at home.
- Quick dessert win: the perfect affogato in 2 minutes.
- Know your limits: the daily caffeine limit by age and weight.
- External authority: Specialty Coffee Association.
FAQ on iced latte at home
Q: What ingredients do I need to make an iced latte at home quickly?
A: You need strong brewed coffee or espresso, milk of your choice, ice cubes, and optional sweeteners like sugar, syrup, or honey. For best results, brew a concentrated coffee using a French press, Moka pot, or espresso machine.
Cold brew concentrate also works well and requires no waiting for cooling.
Q: Can I make an iced latte without an espresso machine?
A: Yes. Use strongly brewed coffee from a drip coffee maker, French press, or instant espresso powder mixed with hot water. Let it cool for a minute or chill it in the freezer for 2-3 minutes. This method delivers rich flavor without special equipment.
Q: How do I prevent my iced latte from tasting watery?
A: Use less ice or pre-chill your coffee before adding it to the glass. Another option is to freeze coffee into ice cubes and use those instead of regular ice. This way, as the cubes melt, they add coffee, not water, to the drink.
Q: How much milk should I add to my iced latte?
A: A standard ratio is 1 part espresso to 2-3 parts milk. For a 16-ounce glass, pour 1-2 ounces of espresso over ice and fill the rest with cold milk, leaving room for flavorings. Adjust the amount based on your taste preference for creaminess.
Q: Can I make a flavored iced latte at home?
A: Yes. Add flavored syrups like vanilla, caramel, or hazelnut after pouring the espresso. Mix well before adding milk. You can also use flavored creamers or a dash of cinnamon or cocoa powder for variety. These additions blend quickly when stirred with hot espresso.
Key Takeaways: Iced latte at home
- Pick the right iced latte at home — match the brew method to the bean origin for the best cup.
- Time the iced latte at home — extraction time is the single biggest flavour lever you control.
- Grind for the iced latte at home — coarse for press, fine for espresso, in between for everything else.
- Water temp for iced latte at home — 92-96°C is the sweet spot for full extraction without bitterness.
- Ratio drives iced latte at home — 1:15 to 1:18 coffee-to-water nails balance for most brew styles.
Apply Iced latte at home to Your Morning
Pick one variable to change this week and brew the iced latte at home the same way for seven days. Taste, log, then adjust.
- The Complete Guide to Coffee Brewing Methods (14 Ways, Ranked by Effort)
- The Complete Guide to Coffee Beans – Origin, Roast, Grind, and Storage
- The Complete Guide to Espresso – Machines, Beans, and Pulling the Perfect Shot
For deeper standards on iced latte at home, see the Specialty Coffee Association.
FAQs: Iced latte at home
What is the easiest iced latte at home for a beginner? The French press is the gentlest start — almost impossible to over-extract, gives a full-bodied cup, and needs no special gear.
How much does iced latte at home setup cost? A solid home rig starts around £80 for grinder, kettle, and one brew device — under £200 covers nearly any method short of espresso.
Does iced latte at home keep overnight? Brewed coffee loses character within 30 minutes. Brew fresh, or cold-brew the night before for an iced drink the next morning.